Recipes from the Road

How to Sprout and Plant Sweet Potato Vines: Experiments As A Kitchen Counter Sweet Potato Farmer

It's funny, I left a tiny two bedroom apartment in Brooklyn to live in a farm house in the country set on four acres of land and I still do the majority of my gardening on my countertops and window sills, just as I did in Brooklyn. Then, if I wanted to use my outdoor space, I'd lift the kitchen screen and set a pot on my rickety fire escape. Home to my many green treasures and mason jar experiments.

Old habits die hard. One day I'll plant row upon row of bountiful veggies and fruits. One day, I'll put in the work to weed and harvest en masse. But for now, I'm content to be a kitchen counter farmer and my latest joy has been creating and replanting sweet potato slips.

I am a huge sweet potato fan. Loaded with vitamins A, C, B1, B2, B6, manganese, copper, potassium, fiber, niacin and phosphorus, they are a healthy, clean eating staple.

You can never have enough sweet potatoes! Every inch can be used. The leaves make delicious salads and steamed greens and the potatoes, where do I begin....pies, breads, cakes, cookies, custards, loaded baked, mashed, fries, hash browns, bisque, and on and on and on.....

Since there are so many uses for sweet potatoes, I like to keep them on hand and one of the easiest ways to ensure sweet potato abundance is to sprout and plant the vines yourself. 

It is so easy! All you need to do is follow these simple steps and you too, can call yourself a kitchen counter sweet potato farmer!

IMG_1293.JPG

1)  Submerge half of your sweet potato in water and wait for it to bud and sprout. This is so easy and may take a few weeks, so be patient. It's best to use organic sweet potatoes here because they're not treated with preservatives and chemicals, which make it difficult to illicit new growth. 

FullSizeRender.jpg
IMG_1287.JPG

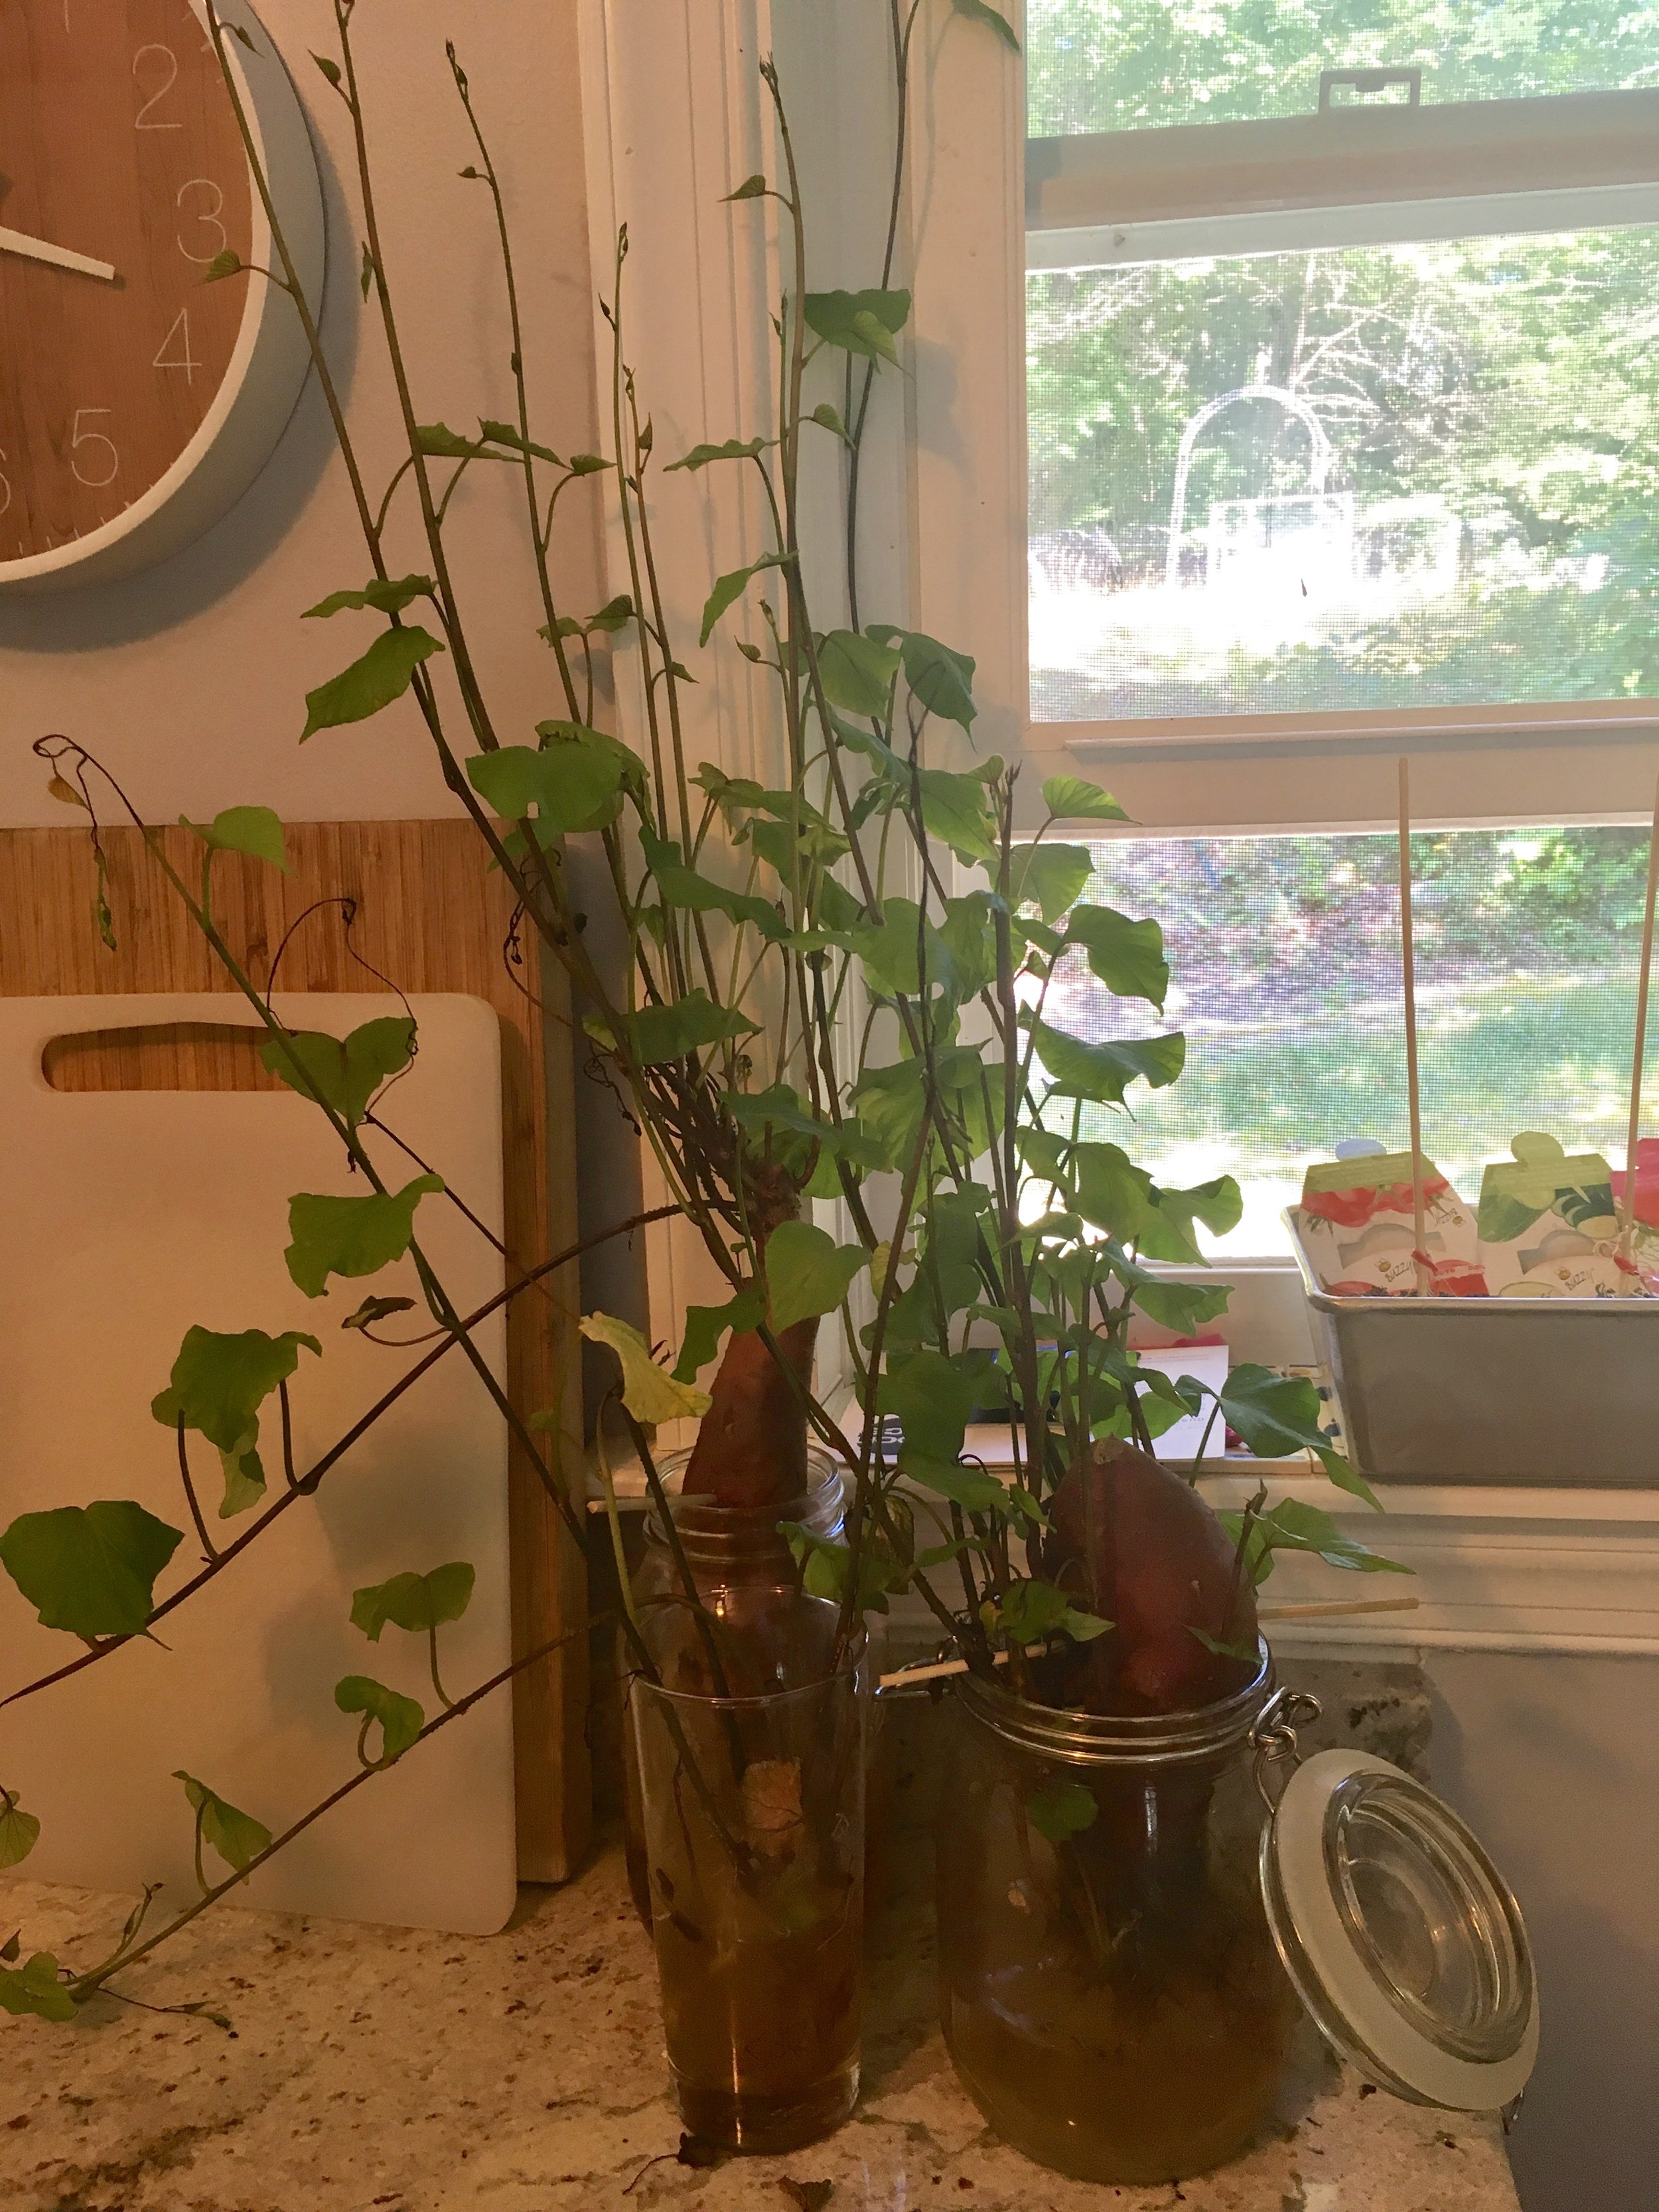
2) Keep your water levels stable. Once you see sprouts and then notice the slips growing, wait until they're about five inches tall before gently removing them from the sweet potato.

IMG_1288.JPG

3) Submerge the base of your slips into water and wait for roots to sprout. Some of the slips that you pull from your sweet potato will have roots attached, well done, those can go directly into soil. 

IMG_1291.JPG

4) Plant your slips and wait for your vines to flourish. Keep in mind, that sweet potatoes are vines and the vines grow quickly. To help control things, I like to prop some of my vines against stakes. 

5) Set your vines in a sunny window and watch them flourish. Harvest your leaves often and add to salads, soups, pestos or sauté like you would spinach. 

IMG_1289.JPG

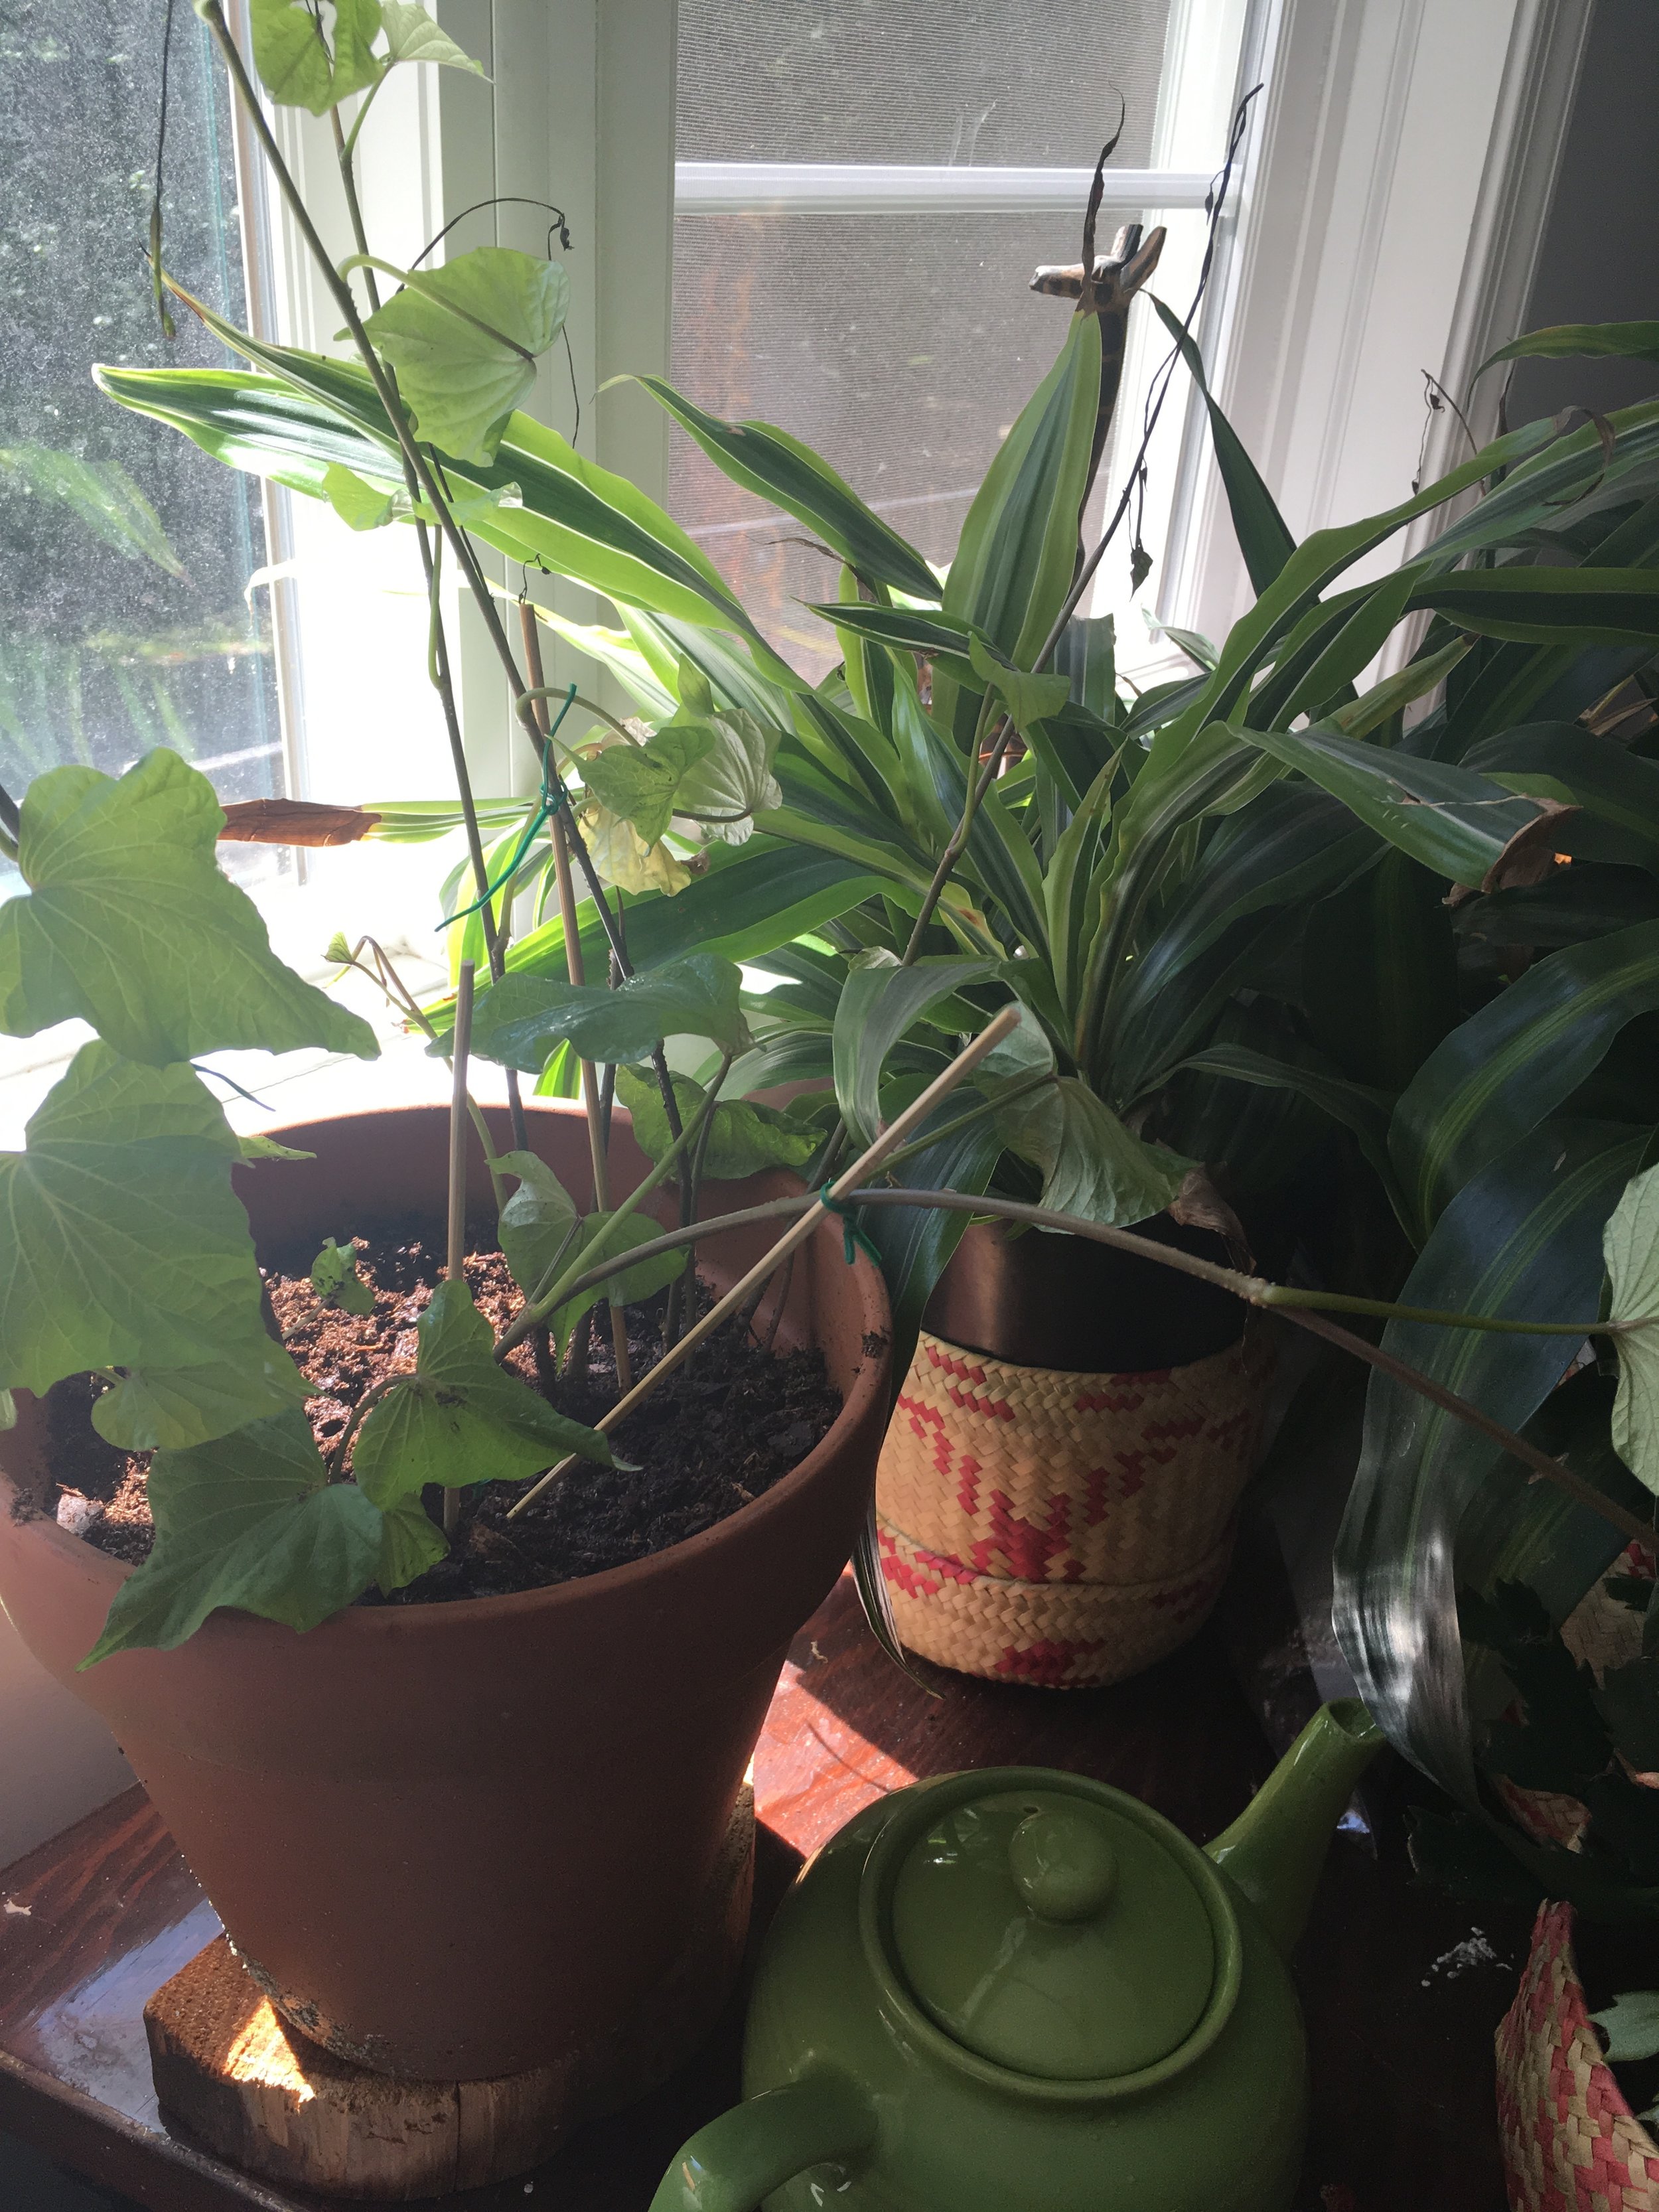
6) In due time, your sweet potato will grow at the bottom of your pot. If you plant directly in the earth, you'll get larger potatoes. 


High Protein Overnight Oats

My mornings, despite my best efforts, are ALWAYS hectic. Between my toddlers, my dog and trying to squeeze in a quick yoga/meditation practice and or writing session before getting everyone walked, dressed, lunches/backpacks prepared and out the door by 7am, mornings are a flurry of activity. 

IMG_1295.JPG

Feeding myself and my kiddos is honestly the most difficult part of this equation. Breakfast is so important, especially for the little ones, but squeezing it all in is tricky. So many of the easy grab and go breakfasts out there are super processed and full of sugars and additives. I'm not interested in fueling my body that way. 

I've been on a clean eating kick lately, and this easy recipe for high protein overnight oats has been a life saver!

IMG_1194.JPG

I prepare my oats directly in a mason jar and take them with me before I head out the door. Preparation couldn't be easier and the ingredients of the oats mixture are protein rich, leaving me sated and satisfied. 

Best of all, my toddlers gobble the overnight oats up, which, considering that it's all natural and organic, is a WIN!!!

I'm still having trouble convincing my husband to jump on the overnight oats bandwagon. But I'm working on him....working....

Here's the recipe for the high protein overnight oats:

1/2 cup oats 

3/4 cups almond milk

1 tablespoon chia seeds

1 tablespoon raw honey (or grade B maple syrup)

1 teaspoon almond butter

1/2 teaspoon vanilla extract

*You can add goodies to this mix as well. E.g. berries, nuts, granola, chocolate chips......go wild!

**I use organic ingredients when I prepare my high protein overnight oats. 

Here's what to do:

IMG_1195.JPG

Put your ingredients in a mason jar or mug in whatever order you wish. Cover and refrigerate overnight. 

That's it!

In the morning, grab and go! 

Seriously, that's it!

Before you indulge, give your oats a good stir to combine all of the ingredients. You can eat it as it is, at room temperature, or pop your jar/mug in the microwave for warm oats. 

Easy high protein overnight oats - a life saver!!!!!

Coconut Carrot Cake with Rose Buttercream Frosting

Sometimes, birthdays have a way of sneaking up on us. 

This year (and don't tell him I told you this!) my husband Mark's birthday shimmied into town way before I was ready! 

He was on tour, so it's not like he was around to remind me and I had the kids and I was finishing my novel and teaching yoga... I have legit excuses! 

Anyhow, the night before his birthday (he was scheduled to fly in the next day), the boys and I stood in the kitchen looking at each other trying to figure out what to do. 

We pulled out crayons and construction paper and made cards and a sign and then my four year old had a brilliant idea. 

"Let's make daddy a birthday cake!" 

"C-A-K-E!!!" my 21 month old shrieked recognizing something he loved to eat. 

My husband is not big on sweets but he does love carrot cake.  

The boys and I piled into the van and headed to the grocery store to quickly stockpile the necessary ingredients and get started on our birthday surprise.

The basis for this recipe came from The Joy of Cooking but I had substitutions in mind: 

image.jpg

-Greek yogurt for moisture

-Pecans not walnuts (he doesn't like walnuts for some odd reason) 

-Grade B maple syrup to replace the white sugar

-Pineapple for sweetness and moisture

-Almond flour to keep the cake light and fluffy

-Coconut oil instead of butter (healthier and worked with my coconut twist on the recipe with the addition of shredded coconut) 

-Rose essence for the frosting (coconut and rose flavors are so complimentary) 

-I almost bought purple carrots then decided against it- I didn't want to be too weird. I'll save the purple ones for another recipe... 

Here's what we needed for our cake recipe

1 cup unrefined organic coconut oil

1/2 cup shredded coconut

1 cup chopped pecans

1/4 cup Greek yogurt

3 cups shredded carrots (I totally cheated and brought them pre- shredded. There's just not enough time in the day...) 

8 oz. crushed pineapple in fruit juice

4 large eggs

1 cup maple syrup (real grade B)

2 teaspoons baking powder

2 teaspoons baking soda

1 teaspoon pink Himalayan salt

1 cup packed light brown sugar

2 teaspoons cinnamon

1 teaspoon nutmeg

1 1/2 cups all purpose flour

1/2 cup almond flour

2 teaspoons pure vanilla extract

Then for the frosting:

4 cups powdered sugar

1 cup butter

2 tablespoons Greek yogurt

2 teaspoons rose water

Dried rose petals


Here's how we did it:


Once the oven was preheated to 325 degrees we set to work.

In a medium sized mixing bowl, we combined with a whisk ( to really break up the almond flour which has a tendency to clump) the all purpose flour, the almond flour, the baking soda, the baking powder and the sea salt.

Once fully combined, we added the nutmeg and cinnamon and set the bowl aside to focus on the wet ingredients. 

First, we combined the coconut oil, eggs and vanilla extract, whisking until fully blended.  

Next, we added the Greek yogurt, maple syrup and brown sugar, whisking until blended and smooth. 

Into the mix we added the crushed pineapples, shredded carrots, shredded coconut and crushed pecans. 

When this was blended completely we folded in our dry ingredient bowl. 

I greased (with coconut oil) and lined (with parchment paper) two 8x8 round cake tins and filled each 3/4 to the top with batter.  

Before bed, the boys and I mixed the cake ingredients together and popped the two rounded cake tins into the oven. Our coconut carrot cake with rose buttercream frosting was coming to life!

40 minutes later, the cake was cooling and I was making the frosting.

In a bowl I combined the powdered sugar and softened butter and blended as I added the rose essence and Greek yogurt. Once my frosting was perfectly smooth and creamy, I set it aside until my cake was fully cooled (about an hour).

I frosted the middle layer first making sure that my layer of frosting was nice and thick. With the rest I decorated the top and sides.

For my final artistic touch, I sprinkled gorgeous dried rosebuds on top and anointed the sides of the cake with shredded coconut.

Can I just tell you how absolutely delectable it all smelled!

It was so hard not to dig in right there on the spot.

image.jpg

But I managed to hold out until the birthday boy came home.

Not to brag, but the cake was epic. As Mark said, "you need to break this one out on Thanksgiving, Christmas and Easter"- epic.

And there you have it. The story of our coconut carrot cake with rose buttercream frosting.

image.jpg

May you enjoy this recipe as well for birthdays and holidays to come!

image.jpg

 Pure bliss I promise you!

Add Coconut Oil to Your Coffee If You're In Need of a Boost!

If you're a lover of coconut, then you'll go crazy over this tip! 

Add coconut oil to your coffee if you're in need of a boost! 

Coconut oil in coffee? 

I first discovered coconut oil coffee when I was living in Brooklyn. Before hopping on the C train at Franklin Ave. I'd pop into Daily Press Cafe. One day, I noticed a coconut oil infused espresso on the menu, I gave it a try. The coconut oil gave my drink a smooth aromatic coconut flavor.  

The next day I tried the coconut oil coffee- I was hooked! 

Not only is coconut oil in coffee absolutely and undeniably yummy, it provides a bunch of health benefits and boosts! 

Adding a heaping teaspoon of organic unrefined coconut oil to your morning cup of coffee:

  •  Boosts metabolism  because the healthy fat from coconut oil is converted directly to fuel which also boosts energy!
  • Boosts the immune system. Coconut oil is naturally anti microbial protecting you from illnesses and germs. If you've been a reader for a while, you know how much I love to use coconut oil in the bath and body products I make, it's for this same reason!

You've got to give it a try! Add a heaping teaspoon of coconut oil to your next cup of coffee.

You may also want to try adding a pinch of cinnamon or a hint of vanilla extract- the results are blissful! 


image.jpg

Cheers! 

Relish this Foolproof Panna Cotta Recipe This Christmas at Family Gatherings

IMG_1196-0.jpg

Relish this Foolproof Panna Cotta Recipe This Christmas at Family Gatherings! Believe it or not, winter is right around the corner!

With the season of joy soon arriving, it’s time for you to bring your culinary skills to the forefront and try something innovative for your friends and family.

Of course, plum cake, brownies and desserts galore are predictable standards, but when near and dear ones come calling, treating them to something beyond ordinary should be your aim.

Something that is delicious and light, creamy and flavorful, like the perfect Panna Cotta!


Pair the dish with topings of your choice and bring on the Christmas charm this year like never before.

With this Panna Cotta, you’ll be sure to wish everyone a JOYFUL CHRISTMAS!

Ingredients:

  • Half a cup black raisins and assorted dry fruits
  • Four tablespoons of rum
  • A couple of gelatin sheets
  • A litre and a half of cream
  • 100gms caster sugar
  • A teaspoon each of allspice, ginger, cinnamon powders
  • A pinch of the heavenly nutmeg powder for taste

Directions:

Place all the dry fruits in a bowl and add to this the four tablespoons of rum. Cover and let it set for half an hour.

The gelatine sheets should be pre-soaked in a bowl of water (colder the better), until the sheets are soft. Drain the excess water from the sheets with your bare hands and give it a good squeeze.

Take a deep pan and heat the spices, cream and the caster sugar to a boil.

Reduce the flame and simmer for three minutes, keeping a watch on the sugar that needs to dissolve.

Get it off the flame and remove the mix from the pan.

Whisk the mixture and place the gelatine sheets into the mix, allowing it to naturally dissolve.

Add the rum-soaked-dry fruits and give it a good but gentle mix for ten seconds.

Place the mix into deep containers and allow it to sit in the freezer for an hour or until you see it set.

When you wish to serve the dish, dip the container into warm water for the ends to loosen up within and turn the dish upside down on a flat surface.

Garnish with chocolate sauce or dry fruits, and serve!

This classy winter delicacy will be the talk of the town as you conjure magic and love in Panna Cotta!

Should you be thinking of how to serve this heart-soothing delicacy, we suggest you explore a wide variety of exquisite serving pieces, artistic three-tier cupcake stands and yummy cake dome and pedestal servers at Horchow.com.

Want some extra savings to be reflected in your checkout while you shop online? You should not wait a single minute and buy some top coupons and promo codes at Horchow today.

Pose yourself as a serious dessert connoisseur by serving your delicate delicacies in high-end luxury serving plates, all while enjoying incredible savings and bidding goodbye to overspending!

A Zanzibar Spiced Coffee Recipe

We were completely jet lagged when we arrived. After a midnight bus ride from Canal Street in New York on the Chinatown Express to 14th street in Washington D.C., where we took a taxi to Dulles airport and slept for four hours on plastic benches before flying ten hours to Addis Ababa, Ethiopia, cue an eight hour layover before arriving in Stone Town, Zanzibar five hours later where we learned that the hotel we'd booked online was overbooked as were all of the hotels and guest houses in town that night, we were in desperate need of a pick me up.

Dragging our rolling luggage behind us over dusty cobblestone streets, we came upon an ocean view cafe.

Perched on silky cushions, we ordered food and began to panic.

The air smelled of cardamom and salt water. In the distance, waves noisily lapped at the beach.

Our coffee came out first. It was served in tiny silver cups, warm to the touch. At first I was confused, the cup smelled more like chai tea than coffee. Don't get me wrong, chai is lovely, but I really wanted coffee and wasn't in the mood for another disappointment.

I took a sip. Equally stimulating and grounding, the coffee bathed my mouth with flavor.  Zanzibar does many things well, their spiced coffee, they do really well.

We stayed in that cafe until it closed. Until we were forced to wander the streets once more in search of a place to stay, which we finally found several hours later as the sun began to rise. Thank goodness for that coffee!

Rarely am I nostalgic about that evening, but when I am, it centers around that coffee.

That's why tonight, after putting the kids to bed, I decided to brew a cup of my version of Zanzibar spiced coffee.

It was almost as good. Here's what I did-

IMG_2607.JPG


Ingredients:

1 rounded scoop of french roast coffee

1 teaspoon fresh cardamom

1 teaspoon fresh sliced ginger

5 whole cloves, crushed

1/4 teaspoon cinnamon

1/4 teaspoon nutmeg

1/4 teaspoon turmeric

IMG_2606.JPG

In a french press add your ingredients along with 1/2 cup boiling water.

Let the coffee sit for five minutes before straining and pouring into your mug.

I added a pinch of almond milk but you can dress your coffee however you'd like.

This recipe makes a strong single cup that is sure to get you through any tough spot you may find yourself in.

IMG_2608.JPG

Clink.


No-Yeast Cinnamon Buns With Almonds

This morning, I woke up in our house in Maryland to six shimmering inches of snow. I made myself a cup of Earl Grey tea and sat by the window. It was quite a sight.

Sunlight streamed through the loops of the naked trees and reflected brilliantly off of the snow bathing my kitchen in light.

How lucky I am, I thought to myself, to be inside and not out.

How lucky I am, to have this nice big kitchen, a full pantry, sleeping children and this wicked craving for sweet almonds and cinnamon buns.

I made myself another cup of tea and put my thinking cap on. I didn't have any yeast, or almond paste...but I did have sliced almonds and I could make cinnamon bun dough out of a drop biscuit variation since I didn't have yeast.

I put on my apron, I dusted off my measuring spoons, I listened to my nose and tasted, and came up with a batch of delectably moist almond cinnamon buns.

It was so easy. Here's what I did-

yeast free almond cinnamon buns

You'll need:

Dough

2 cups flour

2 tablespoons sugar

4 teaspoons baking powder

1/2 teaspoon salt

1 teaspoon almond extract

3 tablespoons unsalted butter

3/4 cup buttermilk

Filling

4 tablespoons butter

1 cup brown sugar

1/4 cup shaved almonds

3 teaspoons cinnamon

Glaze

1/2 cup powdered sugar

2 tablespoons butter

1 teaspoon vanilla extract

1 teaspoon milk

Here's what to do:

Preheat your oven to 375 degrees.

We'll begin with the dough.

In a large mixing bowl, combine your dry ingredients (flour, salt, baking powder, sugar). Once your dry ingredients have been mixed together, cut in your butter, using your hands to mix. Once the batter is flaky, add your milk and almond extract and blend until your batter forms a smooth dough. Set aside.

Time for the filling. In a small mixing bowl, combine your brown sugar, butter, almonds and cinnamon. Mix until a paste is formed. Set aside.

Return to your dough. It's time to roll it out. Using a rolling pin, you want to create a rectangle.

Pour your filing on top of the dough and then roll into a loaf and slice (about 2 inches thick).

Place your slices in a buttered 9x9 circular pan. You want to make sure you leave space between the buns because when they cook, they'll expand and rise.

IMG_2455.JPG

Cook for 20-25 minutes until lightly browned.

IMG_2457.JPG

While your cinnamon buns are cooking, it's time to whip up your glaze. In a bowl, mix your melted butter with your powdered sugar. Once a thick frosting is created, add the milk and vanilla extract and blend again until the glaze thins.

Once your cinnamon buns are ready, remove them from the oven and pour the glaze over the top.

Let the buns cool ten minutes before serving.

IMG_2467.JPG

Psssst... I know I normally post healthy recipes, but this time I didn't. This one is simply indulgent and good and that's all there is to it.

Healthy Sweet Potato Bread Recipe

I've been spending a lot of time in the kitchen lately. Now that my youngest has started solids, I've been glued to the counter blending, mixing, mashing. This is not a baby food recipe. I promise.

It just happened to come about after I made an overly ambitious batch of mashed sweet potatoes for my little one.

I have no idea why I felt compelled to mash five pounds of sweet potatoes, I guess it's because they hold a very sweet spot in my heart. Just thinking back to the sweet potato pies and sweet potato custards I used to eat growing up makes me smile. Now, I can't remember the last time I ordered regular fries at a restaurant, I always opt for sweet potato. One of my favorite neighborhood restaurants serves a hearty sweet potato stew. I'm a bit besotted.

Prepared savory or sweet, I can't get enough of the hearty comforting texture.

Sweet potato or bust!

mashed sweet potatoes

So with some of my extra mashed sweet potatoes, I decided to make bread. If you ask me, sweet potatoes take the prize in a sweet bread. Similar to pumpkin bread, the flavor is so much richer with sweet potatoes. This bread is what would happen if a sweet potato pie married a biscuit. Oh, and did I mention it's pretty darn healthy too?

IMG_1838.JPG

Here's what you'll need: 1 ½ cups flour

1 cup coconut palm sugar

1 teaspoon baking soda

½ teaspoon of sea salt

1 tablespoon fresh grated ginger

1 teaspoon ground nutmeg

1 teaspoon ground cinnamon

½ cup olive oil

2 tablespoons buttermilk

2 eggs, slightly beaten

1 teaspoon vanilla extract

1 cup mashed cooked sweet potatoes

1 cup chopped pistachios

½ cup dark chocolate chips (optional)

Here's what to do: Preheat oven to 350°F then oil (coconut oil works great!) an 8x8 round pan and set aside. In a large bowl, stir together flour, sugar, baking powder, salt, nutmeg and cinnamon. Blend in the oil, milk and eggs.

Make sure your batter is fully blended before adding the sweet potatoes, ginger, pistachios, and chocolate chips.

Mix until uniform and pour into your oiled pan.

Bake 35-40 minutes or until toothpick inserted in center comes out clean. Cool about 1 hour.

IMG_1721.JPG

I dare you not to fall in love!

Recipe for Chocolate Chip Spiced Apple Pancakes

Some of my fondest morning memories are centered around making pancakes. Growing up, whenever I'd visit my grandfather's house in Maryland, he'd have a box of pancake mix waiting for me. My sister and I would whip up batches of sweet, fluffy, buttery pancakes that we'd slather in butter and honey and share with everyone. Those breakfasts, slow and languid, would make us forget about lunch.

Good pancakes are pure magic!

Some of the most comforting meals are the simplest.

It's been a long time since I've made pancakes out of a box. Pancakes are so easy to make from scratch, the box hardly seems necessary anymore. Besides, I love the thrill of creating something from scratch. Cooking so resembles alchemy.

Just like gold, this recipe for chocolate chip spiced apple pancakes is a beautiful autumnal twist on an old classic.

chocolate chip pancakes with spiced apple

Here's what you'll need:

  • 2 teaspoons nutmeg
  • 1 teaspoon cinnamon
  • 1 teaspoon salt
  • 2 teaspoons baking powder
  • 1 teaspoon baking soda
  • 2 cups of sifted flour
  • 2 tablespoons sugar
  • 2 eggs
  • 1/4 cup apple butter
  • 2 cups of buttermilk
  • 2 tablespoons melted, unsalted butter
  • 1/4 cups mini chocolate chips
  • 1 teaspoon vanilla extract

Here's what to do:

  • In a mixing bowl, stir the dry ingredients together (nutmeg, cinnamon, salt, baking powder, baking soda, flour and sugar).
  • In a separate bowl, mix the vanilla, eggs and buttermilk. Once blended, add the melted butter and then the apple butter. Blend thoroughly.
  • Add your wet ingredients to your dry ingredient bowl. Stir until almost completely combined.
  • Butter your griddle and place over medium heat. Spoon your batter onto the griddle by the mixing spoon full and cook until bubbles begin to form, flip and cook until golden brown.
  • If you have any extra batter, a mason jar is excellent storage. Now you can enjoy pancakes quickly later on in the week!IMG_0985
  • Say Hello Autumn with Delicious Moist Pumpkin Bread!

    IMG_0760.JPG
    With the official start of autumn just around the corner, I've decided to celebrate by baking delicious, moist, pumpkin bread.
    One of my favorite things about autumn are the flavors and aromas that arise from baking fall inspired quick breads.
    Pumpkin bread is my favorite quick bread variety. This particular recipe is as rich and moist as it is healthy.
    Chia and flax give it an extra anti-oxidant, omega-3 and fiber burst, while the olive oil gives it a rich round flavor. Dark chocolate chips, craisins and walnuts give the bread bursts of delicious holiday flavors. Together, the ingredients will help you ring in the autumn in festive style.
    Here are the ingredients:
    1 can of pumpkin (15 oz)
    1 cup sugar
    2/3 cup brown sugar 
    1/4 cup chia
    2 tablespoons ground flax
    2/3 cup extra virgin olive oil
    3 teaspoons vanilla extract
    1/8 cup evaporated milk
    4 large eggs
    3 cups all-purpose flour
    1/2 cups walnuts
    1/2 cups craisins
    1/2 cups dark chocolate chips
    2 teaspoons baking soda
    1 teaspoon sea salt
    2 teaspoons ground cinnamon
    1 teaspoon ground nutmeg
    1/2 teaspoon ground cloves
    1/2 teaspoon baking powder
    Here's what to do:
    Preheat your oven to 350 degrees. You'll want to place your baking rack at the bottom of the oven to ensure the best bake.
    In a large mixing bowl, combine your dry ingredients (sugar, brown sugar, flour, baking soda, sea salt, chia, flax, cinnamon, nutmeg, cloves, baking powder) and set it aside. Make sure your dry ingredients are fully blended.
    In a smaller mixing bowl, combine your wet ingredients (pumpkin, evaporated milk, vanilla, olive oil, eggs).
    Mix your chocolate chips, walnuts and craisins into the wet ingredients.
    Mix your wet ingredients into the dry ingredient bowl. Once again, make sure everything is fully blended.
    Pour your mix into a greased loaf pan and place in the oven (remember to lower the rack).
    Bake for an hour, or until your loaf his risen and a toothpick inserted in the center comes out clean.
    IMG_0758.JPG
    Set your pan out to cool (about another hour) before you slice and enjoy this delectable autumn treat.
    IMG_0759.JPG


    Fig and Strawberry Quick Jam

    If you’re a regular on this blog, I don’t need to tell you how much I love biscuits. A natural compliment to my love of biscuits is my new found fascination with making quick jams. Quick jams are great because you get instant gratification. Simply jar and consume. Quick jams can live in your fridge for up to ten days (hence the small batch).

    Here’s what you’ll need:

    1 pint of figs

    5 large strawberries

    1 teaspoon of sugar

    ¼ cup water

    1/2 teaspoon of lemon juice


    Here’s what to do:

    Wash and remove the stems from your figs. Slice each fig in half and place into a saucepan.

    IMG_0303

    Rinse and remove the tops from your strawberries. Slice each strawberry in half and add to your saucepan.

    IMG_0304

    Add the sugar and water and bring to a boil, stirring occasionally for about 15 minutes until the mixture takes on a jelly-like consistency.

    IMG_0305


    IMG_0306

    IMG_0313

    Allow to cool before storing in a small mason jar.

    IMG_0315

    You can store your jam for up to ten days in the refrigerator. YUM!

    Grilled French Toast with Fresh Blueberry Cream

      20140705-121507.jpg

    I love the idea of french toast, but I don't like the smell or taste of eggs; or for that matter, the mess that accompanies the preparation.

    What I do love, is the taste of warm butter, sugar and cinnamon toasted to a perfection with a hint of vanilla. My grilled french toast is my answer to conventional french toast. It's easier to make and focuses (in my humble opinion) on all of the good stuff.

    You don't have to use a baguette, I just happen to love the crispy texture and delicate little bites that they yield, but regular bread will work. You also don't need to add the chia/flax mixture. I add chia and flax to everything I bake. It makes for a nice texture and I derive peace of mind in the knowledge that while I'm saturating my body with butter and sugar, I'm also ingesting some heart healthy anti-oxidants, fiber, omega-3's and calcium.

    Whichever variation you choose, here are the instructions-

    Grilled French Toast:

    1 baguette loaf (I like to use whole wheat)

    1/2 cup butter (melted and soft)

    1 teaspoon of cinnamon

    1 dash of nutmeg

    1 tablespoon of brown sugar

    1 teaspoon of ground chia/flax blend (optional, but a great touch!)

    1 teaspoon vanilla extract


    In a small bowl, combine your butter, cinnamon, nutmeg, sugar, vanilla and chia blend. Mix until the ingredients are blended and the consistency is creamy and spreadable.

    Cut off the heals of your baguette loaf and set aside for another day or recipe. With what remains of the loaf, take a knife and cut 2" pieces.

    You have options when it comes to cooking. I find a panini press or George Foreman grill work best. I love knocking out two sides at the same time. The uniform heat, keeps the bread from burning too.  Also lovely is an indoor stove top grill. If you don't have any of these, a frying pan will also do the trick.

    Dip both sides of your baguette pieces into the butter mixture until heavily coated then place on your grill/pan of choice. You'll know your toast is ready when you smell the delicious scent of heated butter, brown sugar and vanilla extract. Once toasted and golden brown, you're ready to plate and toast the next batch.


    Blueberry Cream:

    1/2 Cup Heavy Whipping Cream

    1 teaspoon sugar

    5 Blueberries

    Place ingredients directly into a blender (if you have a single serve blender or magic bullet- these work the best!). Blend until stiff.

    If you don't have a single serve blender, a hand blender and a bowl will work as well.


    Preparing the plates is really fun. I like to add a trio of fresh berries. Here, I opted for blueberries, raspberries and blackberries. A drizzle of pure maple syrup always sweetens the deal, but most importantly, don't forget to add your dollop of blueberry cream with a fantastic flourish.

    20140705-121530.jpg

    Strawberry Shortcake Biscuits with Fresh Whipped Cream

    20140701-094427.jpg Combine the goodness of a sweet buttery drop biscuit, with the sweet bursts of juicy strawberry chunks and top with a rich, creamy vanilla and cinnamon whipped cream and you've got my Strawberry Shortcake Biscuits.

    Perhaps, an excuse to have desert for breakfast, this is, in my opinion, the perfect way to start a lazy summer weekend day.

    20140701-094441.jpg

    Should you desire to partake in the goodness, here's what to do:

    1) First, I take about a half pint of rinsed strawberries and cut them in fourths so they're nice and chunky.

    2) Then, I prepare my Easy Sweet Drop Biscuits recipe.

    3) I add my strawberries to my drop biscuit batter and proceed to cook as usual

    4) During the ten minutes while the biscuits are cooking, I make my whipped cream. In a small single serve blender, I mix:

    1/2 cup heavy whipping cream

    1 teaspoon of vanilla extract

    1/8 teaspoon of cinnamon

    It takes two minutes to get perfectly peaked, rich whipped cream when using a single serve blender or bullet.

    5) Don't forget to let the biscuits cool before you dig in. You can skip the butters and jams and garnish directly with the fresh cream.

    20140701-094457.jpg

    Mango Guacamole- A sweet twist on a classic favorite

    20140418-095748.jpg In honor of Cinco de Mayo, I'm posting this absolute stunner of a recipe.

    Who doesn't love a good scoop of guacamole? Creamy avocado, savory spices, the crunch of a warm tortilla. This recipe will engage your entire tongue as all of the tastes, sweet, savory, spicy,  are set into action.

    Warning: You may have to break this recipe out on the fifth of every month, not just May! Here's what you'll need:

    3 large avocados (soft to the touch)

    1 mango (soft to the touch)

    1/2 onion

    1 small jalapeno pepper

    1/2 tomato

    1 orange

    1 lemon

    fresh chopped cilantro to taste

    sea salt to taste

    pepper to taste


    Here's what to do:

    Pull out your chopping board, because you've got a lot of dicing (small chop) ahead of you!

    I like to dice in this order: onions, jalapeno, tomato, mango, and avocado (avocados turn brown quickly, that's why I save them for last).

    Once everything has been diced and mixed together, squeeze the juice from the orange and lemon over the mixture. Add chopped cilantro, sea salt and pepper.

    Depending upon your preferred guacamole texture you'll toss or mash. I like to do a combination of both. I don't like my guacamole too pasty, but I do like for it to be somewhat mushed together.

    20140418-095801.jpg


    How to Make Spicy Chai

    I don't usually post recipes, but I am in love with this one that I picked up on the road. Well, I picked part of it up on the road, the rest I improvised based on Ayurveda. Either way, it's a keeper. I see the birth of a new segment "Recipes from the Road." I learned to make the basic chai blend at Seattle's Market Spice www.marketspice.com (more on that later- best shop EVER!)

    Note: You can use any tea in this recipe. I use Rooibos because it's an incredibly nutritious tea (anti-oxidants galore) and is caffeine free. Traditionally a black tea is used.

    Spicy Chai to Enliven a Dreary Seattle Afternoon:

    What You'll Need:

    You'll need a mortar and pestle and a french press or the equivalent (coffee grinder, loose tea bags, etc.)

    Ingredients:

    2 Cups boiled water

    2 heaping teaspoons of rooibos tea

    2 teaspoons of green cardamom pods

    1 teaspoon of cinnamon flakes

    1 teaspoon of whole cloves

    1/2 teaspoon of whole peppercorns

    1/8 teaspoon ground turmeric

    Steps:

    Bring your water to a boil

    Place the loose rooibos tea, the cinnamon flakes and the turmeric in the bottom of your french press or loose tea bag

    In the mortar, grind your pepper just until it begins to crack open revealing the white interior

    Add the pepper to your french press or tea bag

    In the mortar, grind your clove

    Add the clove to your french press or tea bag

    Peel open your cardamom pods to release the seeds

    Pile your cardamom seeds into the mortar and mash to release the aroma and flavor

    Add the cardamom to the french press or tea bag. Pour the boiling water into the french press or steep your tea bag for five minutes.

    Pour and enjoy!

    And since there is no caffeine, guess who loves it too...

    * This recipe produced a 120z batch of chai, two teacups worth!

    What is your favorite recipe from the road?